- Learn about the project
- Set up prerequisites
- Set up the project on your computer
- Add Increments while committing frequently:
Level-0,Level-1,Level-2,Level-3,Level-4,Level-5,Level-6,A-EnumsFri, Aug 21st 1600
If you encounter any problem while doing the project, please post in the forum so that we can take the necessary action. We did significant changes to the individual project (iP) and the team project (tP) this semester. Hence, teething issues are a possibility.
We discourage you from doing project tasks allocated to future weeks, although it is fine to stay ahead of the schedule a bit (but no more than a week ahead).
Reasons: To help you gain and better simulate real projects, we want the project work to be over a longer period, rather than done as a short burst.
Reminder: As stated in the iP grading criteria, some increments need to be done each week. Clumping all the iP work into a short burst will not earn you full marks.
Please follow instructions closely. Any deviations can cause our grading scripts to miss your work (and result in you not getting credit for it).
Deadline:
Note the typical deadline for weekly project tasks:
As stated above, you have until the weekly briefing at the end of this week (i.e., Fri, Aug 21st 1600) to finish this week's iP tasks, but if you fail to do so, we won't penalize you if you can catch up within one more week after that deadline.
2 Set up prerequisites
- Ensure you have followed the Preparation sections of the following course tools:
3 Set up the project on your computer
Read through this week's topics before starting the project.
If you encounter technical problems while doing the iP, follow the guidelines given below:
Your GitHub username : 
Note: Type your GitHub username in the blank above so that we can customize sample commands to fit you.
- Fork https://github.com/NUS-CS2103-AY2627-S1/ip, while noting the points below:Keep the fork name as
ipor else our grading scripts will not be able to detect it. You can change the fork name to something else after the semester (and the grading) is over e.g., after receiving your grade for the course.
Keep the default branch name asmaster. While Git-Mastery usesmainas the default branch name, iP and tP usemaster. As both these are used widely in the industry, it is good for you to be comfortable using both.
Keep the source location as[project root]/src. Our grading scripts look for code in this folder.Uncheck the[ ] Copy the master branch onlyoption so that you get a copy of the full repo. - Enable the issue tracker of your fork (Go to
Settings, scroll to theFeaturessection, and select theIssuescheckbox). Reason: At times we post feedback on your issue tracker.If the issue tracker is enabled, you should be able to visit the following URL:https://github.com/{your_user_name}/ip/issues/new
e.g., https://github.com/[[username: JohnDoe]]/ip/issues/new - Clone the fork onto your computer.Avoid putting Git-controlled files inside cloud-synced (e.g., OneDrive, Dropbox) folders. Reason: Multiple tools trying to detect/sync changes in the same folder can cause conflicts and unexpected behavior.
If you want to access project files from multiple computers, use Git to do that (rather than cloud-syncing tools). - Set up the project in your IDE as explained in the README file, if you plan to use an IDE for the project.Not willing to lose Vim power? If you are worried about losing access to powerful Vim features when using an IDE for the project, note that most IDEs have a Vim plugin (e.g., IdeaVim plugin) for using Vim features within the IDE. In other words, it is possible to access both IDE features and Vim features at the same time!
- Run
Duke.javato verify that your project setup works.
4 Add Increments while committing frequently: Level-0, Level-1, Level-2, Level-3, Level-4, Level-5, Level-6, A-Enums Fri, Aug 21st 1600
Implement the below in the given order.
Keep in mind ...
- From this point onward, commit code at important points. Minimally, commit after completing each increment.
Remember not to commit.classfiles and any other file that should not be revision-controlled.
- From this point onward, after completing each increment,
git tagthe commit that completed the increment with the exact increment ID e.g., Level-2, A-ClassesGit tags are not the same as Git commit messages.%%{init: { 'theme': 'default', 'gitGraph': {'mainBranchName': 'master'}} }%% gitGraph commit id: "..." commit id: "Rename main class" commit id: "Add greeting" tag: "Level-0" commit id: "Add support for echo" commit id: "Fix bug in echo" tag: "Level-1" commit id: "Add support for list" commit id: "Add support for bye"git pushthe code to your forkGit doesn't push tags unless you specifically ask it to. After pushing a tag to your fork, you should be able to see that tag by visitinghttps://github.com/YOUR_USER_NAME/REPO_NAME/tagse.g., https://github.com/[[username: JohnDoe]]/ip/tagsIf you encounter issues connecting Sourcetree with your GitHub account, refer to this Sourcetree Tutorial.
- The relevant textbook topics are:
- Git-Mastery → Lesson: T1L5. Saving a Snapshot
- Git-Mastery → Lesson: T2L5. Updating the Remote Repo
- Git-Mastery → Lesson: T4L2. Tagging Commits
- Be familiar with how this course expects to use AI tools:
FAQ Wait. So, do we hand-code the iP or use the prompts given?
A: It's your decision, as given in the panel above. If you are not sure, you can start with level AI-2 of AI use) and move to higher levels only when you feel it is justified.
- Remember to take note of our plagiarism policies, if you haven't done so already:
Level-0: Rename, Greet, Exit Level 0. Rename, Greet, Exit
(a) Give your chatbot a new name, to differentiate it from the placeholder name Duke.
- Avoid these common choices as well:
Chatty,Jarvis,ChatBot,Chad - Rename
Duke.javato match the chatbot name you selected, and remove all traces ofDukefrom the code.
(b) Update the initial code to simply greet the user and exit.
Example:
____________________________________________________________
[CHATBOT BANNER]
Hello! I'm [CHATBOT NAME].
What can I do for you?
____________________________________________________________
Bye. Hope to see you again soon!
____________________________________________________________
- Horizontal lines are optional. So is the banner.
- Change the wording to match the personality you wish to give your chatbot. The above is an example only.
Level-1: Echo Level 1. Echo
Update the code to echo commands entered by the user, and exit when the user types the command bye.
Example:
...
What can I do for you?
____________________________________________________________
list
____________________________________________________________
list
____________________________________________________________
blah
____________________________________________________________
blah
____________________________________________________________
bye
____________________________________________________________
Bye. Hope to see you again soon!
____________________________________________________________
- The indentations are optional.
You are strongly encouraged to customize the chatbot: In addition to the command/display formats, you can even customize its personality to make your chatbot unique.
Level-2: Add, List Level 2. Add, List
Add the ability to store whatever text the user enters and display it back when requested.
- There is no need to save the data to the hard disk.
- Assume there will be no more than 100 tasks. If you wish, you may use a fixed-size array (e.g.,
String[100]) to store the items.
...
What can I do for you?
____________________________________________________________
read book
____________________________________________________________
added: read book
____________________________________________________________
return book
____________________________________________________________
added: return book
____________________________________________________________
list
____________________________________________________________
1. read book
2. return book
____________________________________________________________
bye
____________________________________________________________
Bye. Hope to see you again soon!
____________________________________________________________
Level-3: Mark as Done Level 3. Mark as Done
Add the ability to mark tasks as done. Optionally, add the ability to change the status back to not done.
Example:list
____________________________________________________________
Here are the tasks in your list:
1.[X] read book
2.[ ] return book
3.[ ] buy bread
____________________________________________________________
mark 2
____________________________________________________________
Nice! I've marked this task as done:
[X] return book
____________________________________________________________
unmark 2
____________________________________________________________
OK, I've marked this task as not done yet:
[ ] return book
____________________________________________________________
When implementing this feature, also follow the extension given below:
Most AI tools support 'skills', which are reusable workflows. We can create our own skills to automate repetitive tasks, and share them with others.
Example When doing a project like the iP, we can create a skill to generate a webpage that shows a visual diff between two versions of the code. This skill can be used to quickly examine the code generated by the AI before moving to the next increment.
Create the present-changes-visually skill
- We have already created a
present-changes-visuallyskill and shared it at https://github.com/se-edu/skill-present-changes-visually.
Instead of creating one from scratch, give the following prompt to Codex.
Create a project-specific skill named present-changes-visually.
Use the repo https://github.com/se-edu/skill-present-changes-visually as the basis.
Ask for my permission if you run into any permission issues. If required packages are missing, go ahead and install them.
If Codex runs into problems when performing tasks (e.g., permission issues, network restrictions, missing tools), push back and ask it to troubleshoot, e.g., Why couldn't you download the file? How to fix?.
- After the skill is created, restart Codex so that it recognizes the new skill.
- To test the skill, you can use the following prompt.
Use the /present-changes-visually skill
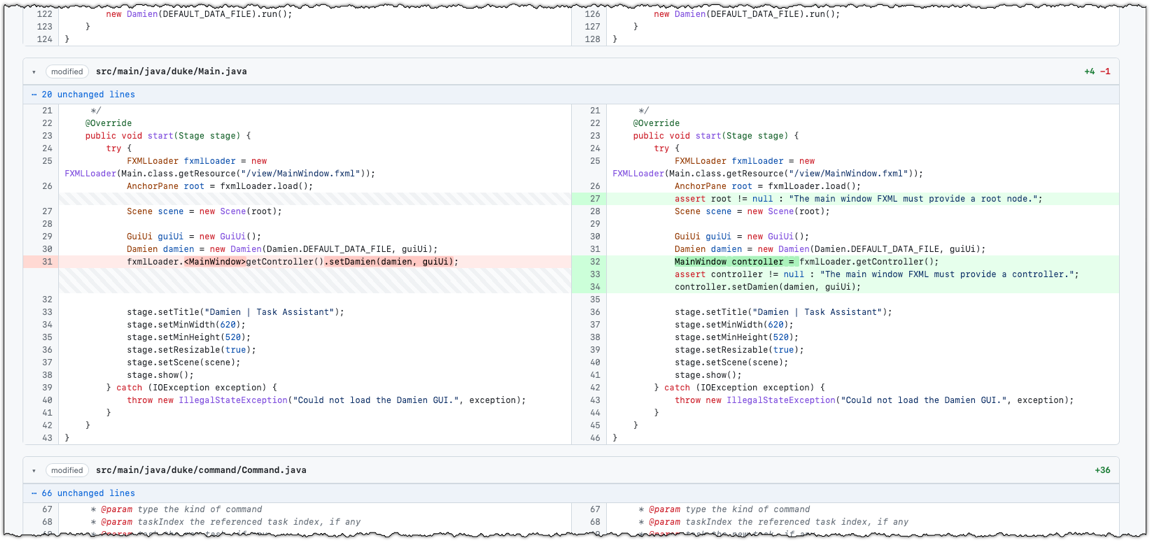
This will create _temp/visual-diff.html, a webpage comparing the current uncommitted changes with the last committed version of the code.
The format of the page should look similar to the screenshot below:
Example result of running the present-changes-visually skill
- You can be more specific when invoking this skill. Here is an example:
Use the /present-changes-visually skill to compare the most recent commit with the one before it.
Save the file as _temp/with-and-without-tasks-class.html.
- Commit the new skill (it will be inside a folder
.codex/skills/present-changes-visually) to the repo so that it is available for future use. Alternatively, you can add it to the.gitignorefile so that the skill stays in your local repo but is not pushed to the remote repo.
Level-4: ToDos, Events, Deadlines Level 4. ToDos, Events, Deadlines
Add support for tracking three types of tasks:
- ToDos: tasks without any date/time attached to them, e.g., visit new theme park
- Deadlines: tasks that need to be done before a specific date/time, e.g., submit report by 11/10/2019 5pm
- Events: tasks that start at a specific date/time and end at a specific date/time,
e.g., (a) team project meeting 2/10/2019 2-4pm (b) orientation week 4/10/2019 to 11/10/2019
Example:
todo borrow book
____________________________________________________________
Got it. I've added this task:
[T][ ] borrow book
Now you have 5 tasks in the list.
____________________________________________________________
list
____________________________________________________________
Here are the tasks in your list:
1.[T][X] read book
2.[D][ ] return book (by: June 6th)
3.[E][ ] project meeting (from: Aug 6th 2pm to: 4pm)
4.[T][X] join sports club
5.[T][ ] borrow book
____________________________________________________________
deadline return book /by Sunday
____________________________________________________________
Got it. I've added this task:
[D][ ] return book (by: Sunday)
Now you have 6 tasks in the list.
____________________________________________________________
event project meeting /from Mon 2pm /to 4pm
____________________________________________________________
Got it. I've added this task:
[E][ ] project meeting (from: Mon 2pm to: 4pm)
Now you have 7 tasks in the list.
____________________________________________________________
At this point, dates/times can be treated as strings; there is no need to convert them to actual dates/times.
Example:
deadline do homework /by no idea :-p
____________________________________________________________
Got it. I've added this task:
[D][ ] do homework (by: no idea :-p)
Now you have 6 tasks in the list.
____________________________________________________________
When implementing this feature, also follow the extension given below:
Level-5: Handle Errors Level 5. Handle Errors
Teach the chatbot to deal with errors such as incorrect inputs entered by the user.
Example:
todo
____________________________________________________________
OOPS!!! The description of a todo cannot be empty.
____________________________________________________________
blah
____________________________________________________________
OOPS!!! I'm sorry, but I don't know what that means :-(
____________________________________________________________
You are strongly encouraged to use your own wording for the error messages, rather than the ones given in the example above.
When implementing this feature, also follow the extension given below:
- Minimal: Handle at least the two types of errors shown in the example above.
- Typical:
- Handle all possible errors in the current version.
- As you evolve the chatbot, continue to handle errors related to the new features added.
- Stretch goal:
- Make the error handling more error-specific, e.g., give the user a clear/specific explanation of the error and how to correct it.
Level-6: Delete Level 6. Delete
Add support for deleting tasks from the list.
Example:
list
____________________________________________________________
Here are the tasks in your list:
1.[T][X] read book
2.[D][X] return book (by: June 6th)
3.[E][ ] project meeting (from: Aug 6th 2pm to: 4pm)
4.[T][X] join sports club
5.[T][ ] borrow book
____________________________________________________________
delete 3
____________________________________________________________
Noted. I've removed this task:
[E][ ] project meeting (from: Aug 6th 2pm to: 4pm)
Now you have 4 tasks in the list.
____________________________________________________________
When implementing this feature, also follow the extension given below: