Week 2 [Mon, Aug 17th] - Topics
Guidance for the item(s) below:
Now, let's switch our focus to the project management aspect of SE.
Broadly speaking, there are two approaches to doing a software project. Those two approaches are also highly relevant to the way this course is run, and how it is different from most SE courses elsewhere.
Let's learn about those two approaches early so that we can better understand how this course works.
The sequential model, also called the waterfall model, views software development as a linear process, with the project progressing through the development stages in order. The name waterfall stems from how the model is drawn to look like a waterfall (see below).
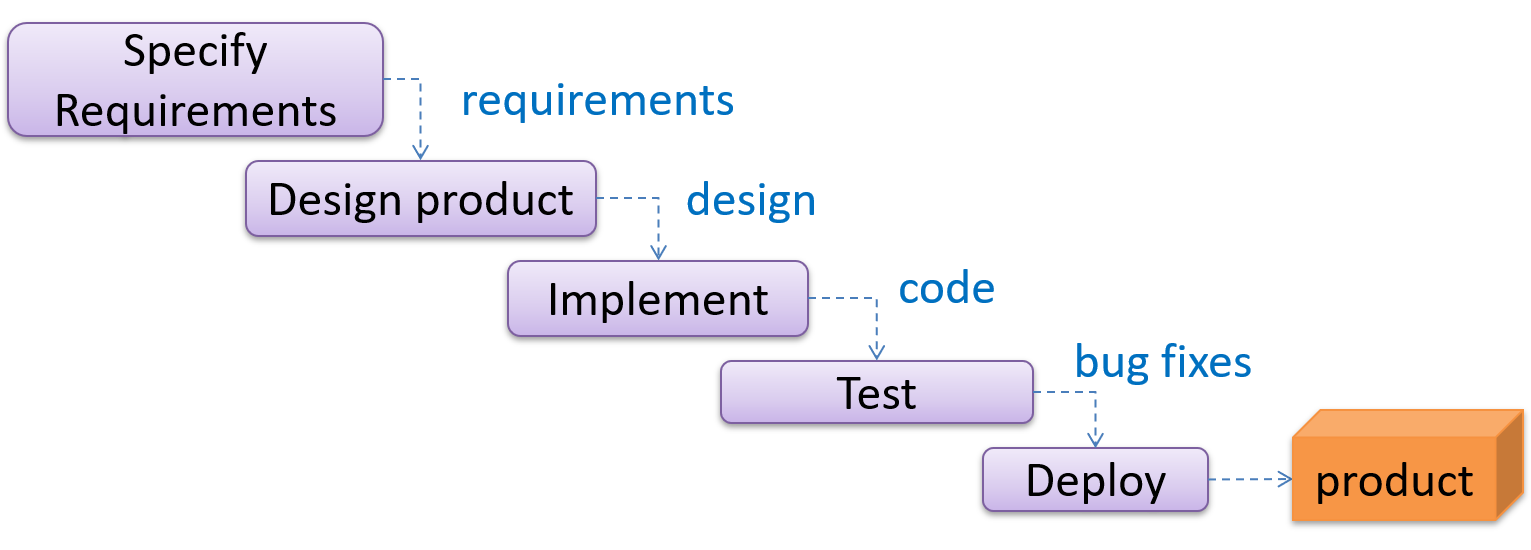
When one stage of the process is completed, it produces some to be used in the next stage. For example, the requirements stage produces a comprehensive list of requirements to be used in the design stage.
A strict sequential model project moves only in the forward direction i.e., each stage is completed before starting the next. For example, once the requirements stage is over, there is no provision for revising the requirements later. In practice the model is often relaxed to let a stage send work back to the one before it, although doing so means redoing work that was already treated as finished.
This model can work well for a project that solves a well-understood problem, in which case the requirements can remain stable and the effort can be estimated accurately. Furthermore, as each stage has a well-defined outcome, progress is easy to track: it is visible from which stage the project is in. Progress within a long stage, which is where an overrun usually builds up, stays much harder to see.
However, real-world projects often tackle problems that are not well-understood at the beginning, which makes those projects unsuitable for this model. For example, target users of a software product may not be able to state their requirements accurately at the start of the project if they have not used a similar product before.
A second weakness is that feedback arrives late. Each stage's output is checked mainly by the stage that follows it, so integration and contact with real users come near the end. A mistake made while gathering requirements or designing therefore tends to surface at the point where going back to completed work costs the most.
The iterative model advocates producing the software by going through several iterations. Each iteration could go through all the stages of the SDLC, from requirements gathering to deployment.
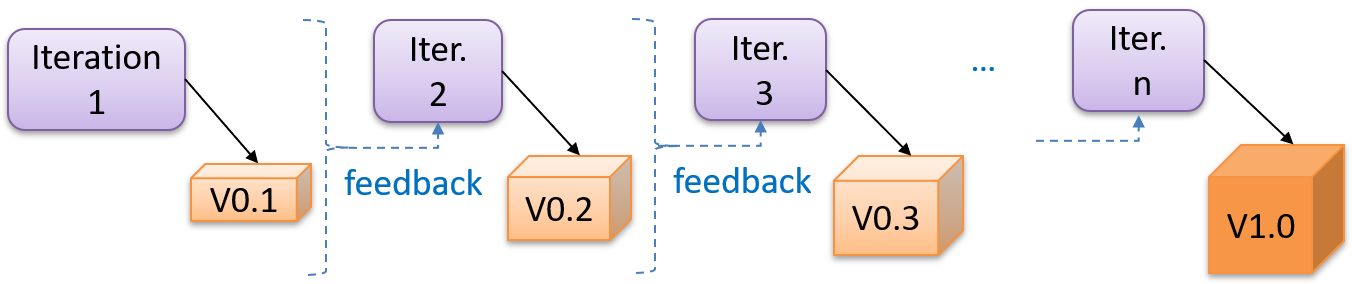
Each iteration produces a new version of the product, building upon the previous version. Feedback from each iteration is factored into the subsequent iterations. For example, if an implementation task took longer than expected, the effort estimate for similar tasks in future iterations can be adjusted. Similarly, if a feature introduced in the current iteration was not well-received by target users, it can be removed or tweaked in the next iteration.
The two models divide a project along different lines.
- A sequential project is divided by activity: a stage is 'requirements' or 'testing', and it ends when that activity is finished for the whole product.
- An iterative project is divided into bounded cycles instead: an iteration runs through several activities and ends in a result the team can learn from.
The iterative model can use a breadth-first or depth-first approach.
- In the breadth-first approach, an iteration evolves all major components and all functionality areas in parallel, producing a working product at the end of each iteration i.e., most features and most are updated in every iteration.
- In the depth-first approach, an iteration focuses on fleshing out only some components or some functionality area. Accordingly, early depth-first iterations might not produce a working product.
Iterating and incrementing are two different things, and most projects do both. To iterate is to rework something that already exists, in the light of feedback; to increment is to add to it. That is why the two are usually named together, as an iterative and incremental approach.
What an iteration delivers is called an increment: a usable improvement or addition to the product, not merely a new version of the code.
Ideally, an iteration should produce not only progress but also new knowledge. Before starting one, decide what would show it succeeded -- a condition the result must satisfy, a test that must pass, or a demonstration to a target user -- and what decision the answer will drive.
Example An iteration can add a new feature while helping the team estimate the effort for similar future features or assess the advantages and disadvantages of the approach used to implement it.
Example Taking a Minesweeper game as an example:
- breadth-first iterations will deliver a fully playable version early. These early versions may have primitive functionality, e.g. a rudimentary text-based UI, fixed board size, limited minefield layouts. This functionality (and the corresponding components) will then be improved in later iterations.
- an early depth-first iteration could deliver the full user interface (UI) but with no game logic at all. Alternatively, an early iteration could focus on just the logic for generating initial layouts of the minefield. Neither is a playable version of the game, but both can collect early feedback -- on the UI in the first case, on the minefield layouts in the second. That feedback then guides later iterations.
A project can be done as a mixture of breadth-first and depth-first iterations i.e., an iteration can contain some breadth-first work as well as some depth-first work, or some iterations can be breadth-first while others are depth-first.
Whichever shape the iterations take, an early one is a chance to find out you were wrong while changing course is still cheap. That makes the assumptions whose failure would cost the most -- an unproven technology, an unfamiliar user need, a performance target nobody has hit yet -- worth putting into an early iteration rather than a late one.
Guidance for the item(s) below:
AI's impact on » Git and GitHub
Git is becoming less something you type and more something you lean on.
- Remembering commands matters less now. An agent can run
gitfor you, so you no longer need to recall the exact command for undoing a change or tidying up a messy history. You do still need to know what those commands do, or you cannot tell whether the agent did the right thing. - Being able to go back matters more. An agent can change many files in seconds, and not every change will be one you wanted. If you committed your work first, getting back is easy; if you did not, the version that worked may be gone for good.
- Reading changes matters more, too. More of your time on Git and GitHub now goes into looking at diffs and pull requests, checking work you did not write yourself. That is why small commits with clear messages are worth the trouble: they are easier to read, easier to undo one at a time, and they record why something was done, which the code alone never tells you.
With that in mind, let's resume our Git-Mastery journey, covering a few more tours. the first two focus on working with GitHub, while the other two focus on getting more out of the Git revision history.
Guidance for the item(s) below:
As you are likely to be using an IDE for the iP, let's learn at least enough about IDEs to get you started using one.
🤔 In case you are puzzled by the sudden change of topic, it's because we take an iterative approach to covering topics, as explained in the panel below:
Guidance for the item(s) below:
As you start adding features to your project iteratively, you'll need a way to detect if the new code breaks the existing code. Next, let's learn a rather simple way to do that using a certain type of testing (we'll be learning more sophisticated methods in later weeks).
This also means we are now switching focus from the implementation aspect to the testing aspect of SE.
Testing: Operating a system or component under specified conditions, observing or recording the results, and making an evaluation of some aspect of the system or component. -- source: IEEE
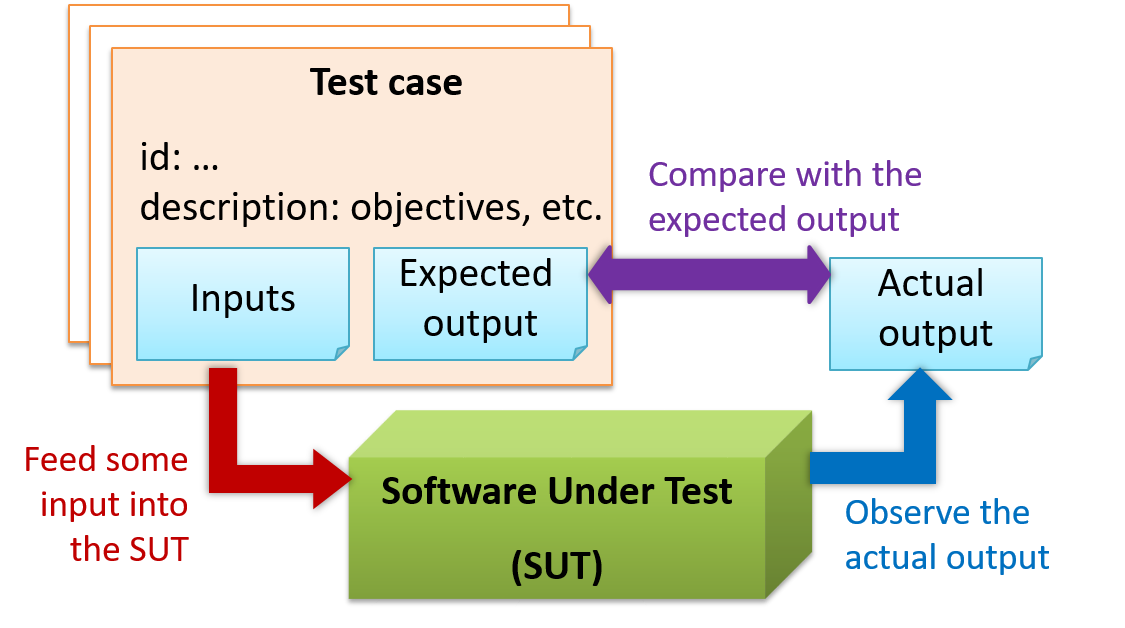
When testing, you execute a set of test cases. A test case specifies how to perform a test. At a minimum, it specifies the input to the software under test (SUT) and the expected behavior.
Example A minimal test case for testing a browser:
- Input – Start the browser using a blank page (vertical scrollbar disabled). Then, load
longfile.htmllocated in thetest datafolder. - Expected behavior – The scrollbar should be automatically enabled upon loading
longfile.html.
Test cases can be determined based on the specification, reviewing similar existing systems, or comparing to the past behavior of the SUT.
For each test case you should do the following:
- Feed the input to the SUT
- Observe the actual output
- Compare actual output with the expected output
A test case failure is a mismatch between the expected behavior and the actual behavior. A failure indicates a potential defect (or a bug) -- we say 'potential' because the error could be in the test case itself.
Example In the browser example above, a test case failure is implied if the scrollbar remains disabled after loading longfile.html. The defect/bug causing that failure could be an uninitialized variable.
Follow up notes for the item(s) above:
AI's impact on » AI and testing
AI greatly reduces the effort needed to automate tests. Drafting test cases, writing test code, and setting up supporting mechanisms now take much less time. As a result, "we did not have time to write tests" is a much weaker excuse.
However, an AI agent cannot know the expected behavior unless someone defines it. This part of a test case must come from someone who understands what the software should do. If an agent writes both the software and its tests, it may make the same mistake in both. All the tests may then pass without proving that the software is correct.
Regression testing becomes even more valuable. AI agents can make large changes quickly, but they do not automatically know which behaviors matter most. An automated regression test suite gives you more confidence when accepting changes you did not write yourself -- and such changes are now being made more frequently.