Project Duke

Duke, the Java Mascot
[credit: Wikipedia]

Project Duke is an educational project that takes you through building a small piece of software incrementally, while you apply as many Java and SE techniques as possible.

The project aims to build a product named Duke, a Personal Assistant Chatbot that helps a person to keep track of various things. The name Duke was chosen as a placeholder name, in honor of Duke, the Java Mascot.

Here is a sample interaction with Duke:

    ____________________________________________________________
      ____        _
     |  _ \ _   _| | _____
     | | | | | | | |/ / _ \
     | |_| | |_| |   <  __/
     |____/ \__,_|_|\_\___|

     Hello! I'm Duke
     What can I do for you?
    ____________________________________________________________

list
    ____________________________________________________________
     Here are the tasks in your list:
     1.[T][X] read book
     2.[D][ ] return book (by: June 6th)
     3.[E][ ] project meeting (from: Aug 6th 2pm to: 4pm)
     4.[T][X] join sports club
    ____________________________________________________________

todo borrow book
    ____________________________________________________________
     Got it. I've added this task:
       [T][ ] borrow book
     Now you have 5 tasks in the list.
    ____________________________________________________________


deadline return book /by Sunday
    ____________________________________________________________
     Got it. I've added this task:
       [D][ ] return book (by: Sunday)
     Now you have 6 tasks in the list.
    ____________________________________________________________

mark 2
    ____________________________________________________________
     Nice! I've marked this task as done:
       [D][X] return book (by: June 6th)
    ____________________________________________________________

blah
    ____________________________________________________________
     OOPS!!! I'm sorry, but I don't know what that means :-(
    ____________________________________________________________

bye
    ____________________________________________________________
     Bye. Hope to see you again soon!
    ____________________________________________________________

You are encouraged to give your chatbot another name (and a different personality if you wish), to differentiate yours from others'. If you give it a personality, please do not use slang or words that some classmates might not know, and avoid offensive language.

The project consists of the following increments:

  • Levels: A series of features to add to your chatbot in the given order; some can be skipped. These have been named Level 0 to Level 10 to indicate how each makes the product progressively "level up".
  • Extensions:
    • Category A These are internal/feature enhancements meant to help you practice a specific Java or an SE technique.
    • Category B These are enhancements related to task tracking.
    • Category C These are enhancements, not specifically related to task tracking.
    • Category D Each of these adds the ability to track another type of entity.

Levels

Level 0. Rename, Greet, Exit

(a) Give your chatbot a new name, to differentiate it from the placeholder name Duke.

  • Avoid these common choices as well: Chatty, Jarvis, ChatBot, Chad
  • Rename Duke.java to match the chatbot name you selected, and remove all traces of Duke from the code.
AI Guidance » Renaming the chatbot
  1. Tweak the AGENTS.md file in the project root, and commit it.

    AI agents read the information in AGENTS.md, which is included in their context.
    In this case, you can tweak the following:

    • Fill in the parts marked as [to be filled]
    • If using a Mac, ensure the instructions about switching to the correct Java version match your Java setup.
  2. Start a new chat/project in Codex (i.e., ChatGPT app in Codex mode). Set your iP folder as the folder of that chat.
    Refer to the tutorial Using the Codex Desktop App at SE-EDU Guides for more info.

  3. Try the following prompt.

I wish to change the chatbot name from duke to [NEW NAME]. Which files need to be changed in what way?

  1. If you are happy with the reply, you can follow up with a Go ahead and make those changes.

    To save tokens, start with a cheaper model (e.g., Luna at High or Extra High setting). Use more expensive models only when cheaper ones fail to meet expectations or you think the task is worth a higher cost of tokens.

    Set the permission level to Approve for me: Codex will still ask for permission before 'risky' actions but will proceed with lower-risk ones without asking every time.

  2. If Codex doesn't update the banner, you can ask it to do so.

Generate an ASCII-art banner for the word [NEW NAME] (case-sensitive). Give me a few variations.

  1. Examine and test the updated code. If you are happy with it, commit the changes. You can ask Codex to create the commit, but if you are new to Git, do the commits yourself -- it can even be faster, and it saves tokens.

(b) Update the initial code to simply greet the user and exit.

Example:

____________________________________________________________
[CHATBOT BANNER]
Hello! I'm [CHATBOT NAME].
What can I do for you?
____________________________________________________________
Bye. Hope to see you again soon!
____________________________________________________________
  • Horizontal lines are optional. So is the banner.
  • Change the wording to match the personality you wish to give your chatbot. The above is an example only.
AI Guidance » Updating the initial code

This change is simple enough to do by hand. Using AI lets you take 'baby steps' without giving up much hand-coding practice. Here are two sample prompts:

The requirement given to me:

[=====

Update the initial code to simply greet the user and exit.

=====]

Here is an example output:

____________________________________________________________
[CHATBOT BANNER]
Hello! I'm [CHATBOT NAME].
What can I do for you?
____________________________________________________________
Bye. Hope to see you again soon!
____________________________________________________________

Your task: I have updated the code to match the requirements. Review my changes and suggest possible issues and areas to improve.


Your task: Update the code to meet the above requirements.

[=====

Update the initial code to simply greet the user and exit.

=====]

Example output:

____________________________________________________________
[CHATBOT BANNER]
Hello! I'm [CHATBOT NAME].
What can I do for you?
____________________________________________________________
Bye. Hope to see you again soon!
____________________________________________________________


Level 1. Echo

Update the code to echo commands entered by the user, and exit when the user types the command bye.


Example:
     ...

     What can I do for you?
    ____________________________________________________________

list
    ____________________________________________________________
     list
    ____________________________________________________________

blah
    ____________________________________________________________
     blah
    ____________________________________________________________

bye
    ____________________________________________________________
     Bye. Hope to see you again soon!
    ____________________________________________________________

  • The indentations are optional.

You are strongly encouraged to customize the chatbot: In addition to the command/display formats, you can even customize its personality to make your chatbot unique.

AI Guidance » Level 1. Echo

Start a new chat thread in the Codex project you created in Level-0.

Use one chat thread per iP increment, and rename the thread to match the increment. Renaming makes past chat threads easier to find, and, more importantly, one thread per increment reduces the risk of context rot .

First part of a possible prompt:

The requirement given to me:

[=====

Update the code to echo commands entered by the user, and exit when the user types the command bye.

=====]

An example output:

     ...

     What can I do for you?
    ____________________________________________________________

list
    ____________________________________________________________
     list
    ____________________________________________________________

blah
    ____________________________________________________________
     blah
    ____________________________________________________________

bye
    ____________________________________________________________
     Bye. Hope to see you again soon!
    ____________________________________________________________

Second part of a possible prompt:

Your task: I have updated the code to match the requirements. Review my changes and suggest possible issues and areas to improve.


Your task: Update the code to meet the above requirements.


Level 2. Add, List

Add the ability to store whatever text the user enters and display it back when requested.

  • There is no need to save the data to the hard disk.
  • Assume there will be no more than 100 tasks. If you wish, you may use a fixed-size array (e.g., String[100]) to store the items.

Example:
    ...
     What can I do for you?
    ____________________________________________________________

read book
    ____________________________________________________________
     added: read book
    ____________________________________________________________

return book
    ____________________________________________________________
     added: return book
    ____________________________________________________________

list
    ____________________________________________________________
     1. read book
     2. return book
    ____________________________________________________________
bye
    ____________________________________________________________
     Bye. Hope to see you again soon!
    ____________________________________________________________

AI Guidance » Level 2. Add, List

First part of a possible prompt:

The requirement given to me:

[=====

Add the ability to store whatever text the user enters and display it back when requested.

  • There is no need to save the data to the hard disk.
  • Assume there will be no more than 100 tasks. If you wish, you may use a fixed-size array (e.g., String[100]) to store the items.

=====]

An example output:

    ...
     What can I do for you?
    ____________________________________________________________

read book
    ____________________________________________________________
     added: read book
    ____________________________________________________________

return book
    ____________________________________________________________
     added: return book
    ____________________________________________________________

list
    ____________________________________________________________
     1. read book
     2. return book
    ____________________________________________________________
bye
    ____________________________________________________________
     Bye. Hope to see you again soon!
    ____________________________________________________________

Second part of a possible prompt:

Your task: I have updated the code to match the requirements. Review my changes and suggest possible issues and areas to improve.


Your task: Update the code to meet the above requirements.


Level 3. Mark as Done

Add the ability to mark tasks as done. Optionally, add the ability to change the status back to not done.

Example:
list
    ____________________________________________________________
     Here are the tasks in your list:
     1.[X] read book
     2.[ ] return book
     3.[ ] buy bread
    ____________________________________________________________

mark 2
    ____________________________________________________________
     Nice! I've marked this task as done:
       [X] return book
    ____________________________________________________________

unmark 2
    ____________________________________________________________
     OK, I've marked this task as not done yet:
       [ ] return book
    ____________________________________________________________

When implementing this feature, also follow the extension given below:

Extension: A-Classes


AI Guidance » General: Proceed in small steps. Examine each step.

Using AI for coding can cost us our understanding of the code, and the coding and problem-solving skills we would have gained by doing the work ourselves. We should proceed in small steps, examining each one before moving on, so we understand what is happening and learn from it.

Example In this iP increment, we can break the task into smaller steps, such as:

  1. Implement the mark command to update task status, without using additional classes.
  2. Implement the unmark command to update task status, without using additional classes.
  3. Implement the A-Classes extension by introducing a Task class.

AI Guidance » General: Use AI to explore more.

Under time pressure, we normally implement the option we think is best without considering alternatives. With AI, we can generate and compare multiple options quickly, make more informed decisions, and learn from the alternatives.

Example In this iP increment, most would have used a Task class right away. However, we can ask the AI to generate code for the mark and unmark commands without using a Task class. We can then compare the two approaches.


AI Guidance » General: Using 'skills' to create reusable workflows.

Most AI tools support 'skills', which are reusable workflows. We can create our own skills to automate repetitive tasks, and share them with others.

Example When doing a project like the iP, we can create a skill to generate a webpage that shows a visual diff between two versions of the code. This skill can be used to quickly examine the code generated by the AI before moving to the next increment.

Create the present-changes-visually skill

  1. We have already created a present-changes-visually skill and shared it at https://github.com/se-edu/skill-present-changes-visually.
    Instead of creating one from scratch, give the following prompt to Codex.

Create a project-specific skill named present-changes-visually. Use the repo https://github.com/se-edu/skill-present-changes-visually as the basis. Ask for my permission if you run into any permission issues. If required packages are missing, go ahead and install them.

If Codex runs into problems when performing tasks (e.g., permission issues, network restrictions, missing tools), push back and ask it to troubleshoot, e.g., Why couldn't you download the file? How to fix?.

  1. After the skill is created, restart Codex so that it recognizes the new skill.
  2. To test the skill, you can use the following prompt.

Use the /present-changes-visually skill

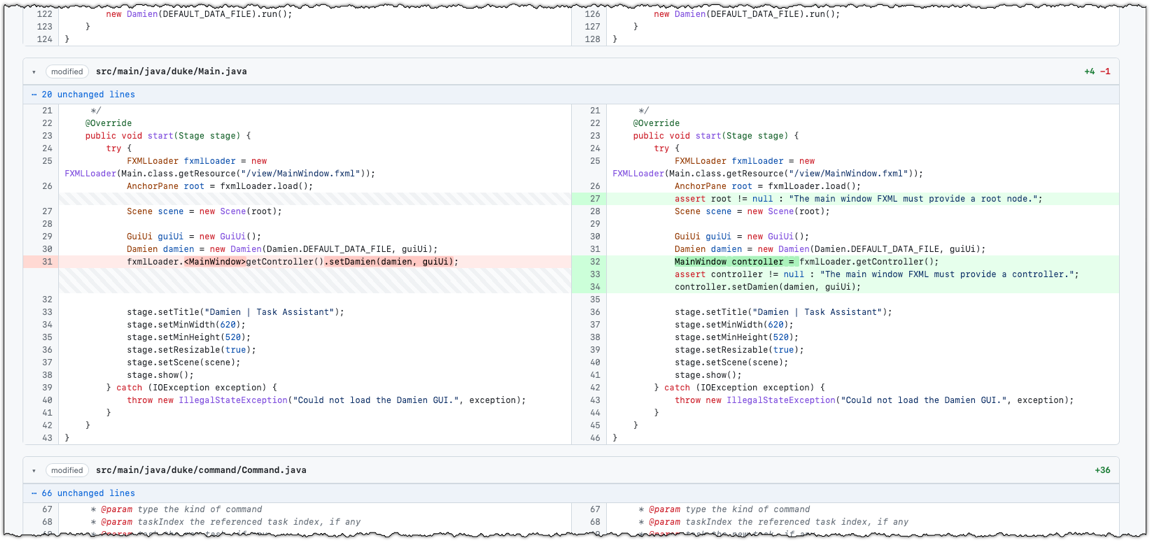
This will create _temp/visual-diff.html, a webpage comparing the current uncommitted changes with the last committed version of the code.
The format of the page should look similar to the screenshot below:

Example result of running the present-changes-visually skill

  1. You can be more specific when invoking this skill. Here is an example:

Use the /present-changes-visually skill to compare the most recent commit with the one before it. Save the file as _temp/with-and-without-tasks-class.html.

  1. Commit the new skill (it will be inside a folder .codex/skills/present-changes-visually) to the repo so that it is available for future use. Alternatively, you can add it to the .gitignore file so that the skill stays in your local repo but is not pushed to the remote repo.

AI Guidance » Level 3. Mark as Done

Step 1: Implement the mark command to update task status, without using additional classes

Implement the following requirement.

[=====

Add the ability to mark tasks as done. Do not add any new classes.

=====]

Example output:

list
    ____________________________________________________________
     Here are the tasks in your list:
     1.[X] read book
     2.[ ] return book
     3.[ ] buy bread
    ____________________________________________________________

mark 2
    ____________________________________________________________
     Nice! I've marked this task as done:
       [X] return book
    ____________________________________________________________

list
    ____________________________________________________________
     Here are the tasks in your list:
     1.[X] read book
     2.[X] return book
     3.[ ] buy bread
    ____________________________________________________________

Examine the new code using your code editor. Commit the changes.

Step 2: Implement the unmark command to update task status, without using additional classes

Implement the following requirement. [=====

Add the ability to reverse the done status of tasks. Do not add any new classes.

=====]

Example output:

list
    ____________________________________________________________
     Here are the tasks in your list:
     1.[X] read book
     2.[X] return book
     3.[ ] buy bread
    ____________________________________________________________

unmark 2
    ____________________________________________________________
     OK, I've marked this task as not done yet:
       [ ] return book
    ____________________________________________________________

list
    ____________________________________________________________
     Here are the tasks in your list:
     1.[X] read book
     2.[ ] return book
     3.[ ] buy bread
    ____________________________________________________________

As before, examine the code, and commit.

Step 3: Implement the A-Classes extension

Implement the following requirement.

[=====

Add a Task class to represent tasks. Put that class in a separate file.

=====]

Partial solution:

public class Task {
    protected String description;
    protected boolean isDone;

    public Task(String description) {
        this.description = description;
        this.isDone = false;
    }

    public String getStatusIcon() {
        return (isDone ? "X" : " "); // mark done task with X
    }

    //...
}

Elsewhere in the code:

Task t = new Task("read book");
t.markAsDone();

Now that we have multiple files being updated, it is a good time to put the present-changes-visually skill to use. Invoke the skill and use the generated file to examine how introducing a separate Task class changes the code structure.

If you are not sure of the pros and cons of adding this new class, simply prompt Codex to explain it to you. Feel free to probe further using follow-up questions and push back using counterarguments.


Level 4. ToDos, Events, Deadlines

Add support for tracking three types of tasks:

  1. ToDos: tasks without any date/time attached to them, e.g., visit new theme park
  2. Deadlines: tasks that need to be done before a specific date/time, e.g., submit report by 11/10/2019 5pm
  3. Events: tasks that start at a specific date/time and end at a specific date/time,
    e.g., (a) team project meeting 2/10/2019 2-4pm (b) orientation week 4/10/2019 to 11/10/2019

Example:

todo borrow book
    ____________________________________________________________
     Got it. I've added this task:
       [T][ ] borrow book
     Now you have 5 tasks in the list.
    ____________________________________________________________

list
    ____________________________________________________________
     Here are the tasks in your list:
     1.[T][X] read book
     2.[D][ ] return book (by: June 6th)
     3.[E][ ] project meeting (from: Aug 6th 2pm to: 4pm)
     4.[T][X] join sports club
     5.[T][ ] borrow book
    ____________________________________________________________

deadline return book /by Sunday
    ____________________________________________________________
     Got it. I've added this task:
       [D][ ] return book (by: Sunday)
     Now you have 6 tasks in the list.
    ____________________________________________________________

event project meeting /from Mon 2pm /to 4pm
    ____________________________________________________________
     Got it. I've added this task:
       [E][ ] project meeting (from: Mon 2pm to: 4pm)
     Now you have 7 tasks in the list.
    ____________________________________________________________

At this point, dates/times can be treated as strings; there is no need to convert them to actual dates/times.

Example:


deadline do homework /by no idea :-p
    ____________________________________________________________
     Got it. I've added this task:
       [D][ ] do homework (by: no idea :-p)
     Now you have 6 tasks in the list.
    ____________________________________________________________

When implementing this feature, also follow the extension given below:

Extension: A-Inheritance


AI Guidance » Level 4. ToDos, Events, Deadlines

As before, you can proceed in small steps, for example, first adding the feature without using inheritance and then adding the extension A-Inheritance. Commit after each step, and tag after completing each increment.


AI Guidance » General: Get AI to check its work

Recent AI coding harnesses already check their own work to some extent. Even so, it is worth strengthening those guard rails yourself. In addition, do some manual testing of your own.

Create a test-ui skill that you (and Codex) can use to test the code. Here's a sample prompt:

Create a project-specific skill named test-ui, as follows.

  • The skill should accept lists of commands and expected outputs. For each command, it should run the program and check the output against the expected output.
  • The list of test cases (and other relevant information) should be recorded in the test/ui-test-plan.md file.
  • Each test case should specify the aim of the test case, inputs, and the expected output.
  • After testing, show a record of the console input and output so we can see the test session.
  • If a test case failed, terminate the test session immediately, and report the actual and expected outputs.

After the skill is created, invoke it. If the behavior is not to your satisfaction, you can ask the AI to improve the skill.

To ensure the skill is used after each code update, you can issue a prompt such as the following:

Update relevant agent files to ensure that after each code update,

  1. the test/ui-test-plan.md is updated (if needed), and,
  2. the test-ui skill is invoked.

It is likely this will result in an update to the AGENTS.md file.

Commit the changes to the Codex files.


Level 5. Handle Errors

Teach the chatbot to deal with errors such as incorrect inputs entered by the user.

Example:

todo
    ____________________________________________________________
     OOPS!!! The description of a todo cannot be empty.
    ____________________________________________________________

blah
    ____________________________________________________________
     OOPS!!! I'm sorry, but I don't know what that means :-(
    ____________________________________________________________

You are strongly encouraged to use your own wording for the error messages, rather than the ones given in the example above.

When implementing this feature, also follow the extension given below:

Extension: A-Exceptions


  • Minimal: Handle at least the two types of errors shown in the example above.
  • Typical:
    • Handle all possible errors in the current version.
    • As you evolve the chatbot, continue to handle errors related to the new features added.
  • Stretch goal:
    • Make the error handling more error-specific, e.g., give the user a clear/specific explanation of the error and how to correct it.
AI Guidance » Level 5. Handle Errors

As before, you can proceed in small steps. Ensure AI runs the test-ui skill after each code update.


AI Guidance » General: Keep updating AI files

As the project progresses, observe where AI falters or overlooks things, and update the AI files accordingly.

For example, you can force AI to improve the quality of testing with a prompt like this:

Add more test cases to cover edge cases and incorrect inputs. Interleave positive and negative test cases to detect incorrect inputs affecting the correctness of the internal states.

Then, you can introduce temporary bugs into the code and see if the test-ui skill can detect them. If it cannot, you can ask AI to improve the skill to cover such cases.


Level 6. Delete

Add support for deleting tasks from the list.

Example:

list
    ____________________________________________________________
     Here are the tasks in your list:
     1.[T][X] read book
     2.[D][X] return book (by: June 6th)
     3.[E][ ] project meeting (from: Aug 6th 2pm to: 4pm)
     4.[T][X] join sports club
     5.[T][ ] borrow book
    ____________________________________________________________

delete 3
    ____________________________________________________________
     Noted. I've removed this task:
       [E][ ] project meeting (from: Aug 6th 2pm to: 4pm)
     Now you have 4 tasks in the list.
    ____________________________________________________________

When implementing this feature, also follow the extension given below:

Extension: A-Collections


AI Guidance » General: Get AI to review tests
  • You can also ask different Codex models to review the ui-test-plan.md and suggest ways to improve it. Something overlooked by one model can be detected by another.
  • This is also a good place to use more powerful models. Crafting good test cases has long-term benefits and is worth the extra token cost.
  • You can go one step further and get other AI tools (Claude, Gemini, etc.) to review the test cases file too.


Level 7. Save

Save the tasks on the hard disk automatically whenever the task list changes. Load the data from the hard disk when the chatbot starts up. You may hard-code the file name and relative path from the project root, e.g., ./data/duke.txt

The format of the file is up to you. Example:

T | 1 | read book
D | 0 | return book | June 6th
E | 0 | project meeting | Aug 6th 2-4pm
T | 1 | join sports club

If you use file paths in your code:

  • Use relative paths rather than absolute paths such as C:\data. If not, your app can cause unpredictable results when used on another computer.
  • Specify file paths in an OS-independent way. If not, your app might not work when used on a different OS.

Your code must the case where the data file doesn't exist at the start. Reason: when someone else takes your chatbot and runs it for the first time, the required file will not exist on their computer. Similarly, if you expect the data file to be in a specific folder (e.g., ./data/), you must also handle the case where the folder doesn't exist yet.

Stretch goal: Handle the situation of the data file being corrupted (i.e., content not in the expected format).

AI Guidance » Level 7. Save

One possible way to break this increment into small steps is:

  1. Implement writing to the file. Ask for a minimal implementation for the only.
  2. Implement reading from the file. Happy path only.
  3. Add error handling.
  4. Ask the AI to check whether the two notes above (the one about file paths and the one about the file not existing) are covered.

If you are confident that you know how to implement this increment yourself, you can ask for a more complete implementation in one go.

Here are sample prompts for the incremental approach above.

Here is the requirement:

[=====

Save the tasks on the hard disk automatically whenever the task list changes. Load the data from the hard disk when the chatbot starts up. You may hard-code the file name and relative path from the project root, e.g., ./data/duke.txt

The format of the file is up to you. Example:

T | 1 | read book
D | 0 | return book | June 6th
E | 0 | project meeting | Aug 6th 2-4pm
T | 1 | join sports club

=====]

For now, do a minimal implementation of the "happy path" for writing to the file. Reading from the file can be implemented later. Update tests and run /test-ui. At the end, run /present-changes-visually

Proceed to implementing the reading from the file, similar to the previous round.

In this round, enhance the code to handle all edge cases and possible errors.

Here are two additional requirements. Ensure the code meets them too.

...


AI Guidance » General: Compact to prevent context rot

AI tools can show how much of the context window the current chat thread has used. In Codex, typing / in an empty chat box pops up details about the ongoing chat, including a line named Compact that states the status of the context window.

It is said that the AI will start getting 'dumber' once you go past 30-40% of the context window. If that happens to you, you can use the /compact command to compact the context.

More about compacting context


Level 8. Dates and Times

Teach the chatbot how to understand dates and times. For example, if the command is deadline return book /by 2/12/2019 1800, the chatbot should understand 2/12/2019 1800 as 2nd of December 2019, 6pm, instead of treating it as just a String.

  • Minimal: Store deadline dates as a java.time.LocalDate (or java.time.LocalDateTime) in your task objects. Accept dates in a format such as yyyy-mm-dd (e.g., 2019-10-15) and print in a different format such as MMM dd yyyy (e.g., Oct 15 2019).
  • Stretch goal: Use dates and times in more meaningful ways, e.g., add a command to print deadlines/events occurring on a specific date.
AI Guidance » General: Look out for random deviations

AI can do an action (such as running the tests) the first few times without any issue but run into a problem the next time. At times, wanting to be helpful, it will then try to 'fall back' on alternatives. If you are not monitoring the AI carefully, you might not even realize that AI did something different, and that what it did is not what you wanted.

If you see AI going off-track, stop and issue firmer instructions.


Level 9. Find

Give users a way to find a task by searching for a keyword in the task description.

Example:

find book
    ____________________________________________________________
     Here are the matching tasks in your list:
     1.[T][X] read book
     2.[D][X] return book (by: June 6th)
    ____________________________________________________________
AI Guidance » Level 9. Find

As this increment is fairly straightforward, breaking it into smaller steps might not have much learning value. You can try to 'one shot' it: give the AI all the information up front and ask it to complete the increment entirely, including committing, tagging, and pushing. If the AI misses parts of the expected work, you can learn from that and try to be more comprehensive next time.


Level 10. GUI

Add a GUI to the chatbot, using JavaFX.


Refer to the JavaFX Tutorial @SE-EDU/guides to learn how to get started with JavaFX.
Complete at least the first four parts of the tutorial. Part 5 covers cosmetic UI tweaks and is optional to learn.

AI Guidance » JavaFX Tutorial

You can use AI to go through the JavaFX tutorial the same way you've been doing so far in the project.

For example, after setting up the starter project given in the JavaFX tutorial in a local folder, you can start a Codex project in that folder. Next, you can use a prompt like this:

See the JavaFX tutorial given at https://se-education.org/guides/tutorials/javaFxPart1.html

Implement the HelloWorld application as described in that page.

How much you use AI depends on how deeply you want to internalize JavaFX concepts. If you don't expect to need JavaFX in the future, you can go for maximum use of AI.

If you wish to use the present-changes-visually skill in this project as well, you can issue a prompt like this:

Promote the skill present-changes-visually I created in the project [give the project folder here] into a system-wide skill so that I can use it from other projects.

You might have to restart Codex to make the promoted skill available for use.


There are two non-trivial steps to take here:

  1. learning JavaFX basics
  2. creating a GUI for your chatbot

Do not try to do both in one go. Instead, complete the JavaFX tutorial as a separate project before adding a GUI to the chatbot.

Common mistake: Forgetting to add a separate Launcher class (as explained in the JavaFX tutorial Part 1) when adding the GUI to your project.

Minimal requirement: The GUI should be fit-for-purpose, i.e., users should be able to use the chatbot via the GUI.

AI Guidance » Level 10. GUI

Normally, GUI programming is hard. But with the help of AI, you can now build a fairly decent GUI quite quickly.

As this increment involves a GUI, at times it may be easier to communicate with AI using annotated screenshots (or even screen recordings), e.g., The button is overlapping with the text box. See attached screenshot.

Codex has a built-in plugin called 'Computer use' that gives it the ability to drive apps on your computer like a human user (e.g., click on buttons). You can see if it can help you do simple GUI tests of the app. For example:

Use your 'computer use' plugin to test the basic functionality of the chatbot GUI. Let me know if I need to enable/configure anything to help with that.


Category A Extensions

A-Classes

     Use a class to represent tasks

While you could represent a task list as a multi-dimensional array of , the more natural approach is to use a Task class.

Add more classes along the way, following the OOP approach.


A-Inheritance

     Use inheritance to support multiple task types

As the task types share some similarities, you can implement Todo, Deadline, and Event classes to inherit from a Task class.

Furthermore, use polymorphism to store all tasks in a data structure containing Task objects, e.g., Task[100].


A-AbstractClasses

     Use abstract classes

Make the Task class an abstract class. If applicable, use abstract methods as well.


A-Exceptions

     Use exceptions to handle errors

Use exceptions to handle errors. For example, define a custom exception class (e.g., DukeException -- name it to match your chatbot's name) to represent exceptions specific to your chatbot.


A-TextUiTesting

     Test using the I/O redirection technique

Use the input/output redirection technique to semi-automate the testing of your chatbot.

Notes:

  • A tutorial on this technique is here.
  • The required scripts are provided in the Duke repo (see the text-ui-test folder).

Expectations:

  • Minimal: Use this technique to ensure at least some user commands receive the correct response from the chatbot.
  • Typical: Use this technique to test most of the typical user commands, reducing the need for manual testing as much as possible.
  • Stretch goals: Keep evolving these tests as you add more features to the chatbot, to ensure most current features are tested through this technique.

A-Collections

     Use Java Collections classes

Use Java Collections classes for storing data. For example, you can use an ArrayList<Task> to store the tasks. They offer many advantages (e.g., dynamic sizing, easy to find/add/delete items) over using a primitive data structure such as a normal array.


A-MoreOOP

     Make the code more OOP

Gradually (i.e., in small steps) extract closely related code as classes.

  • Minimal: Extract the following classes:
    • Ui: deals with interactions with the user
    • Storage: deals with loading tasks from the file and saving tasks in the file
    • Parser: deals with making sense of the user command
    • TaskList: contains the task list, e.g., it has operations to add/delete tasks in the list

For example, the code of the main class could look like this:

public class Duke {

    private Storage storage;
    private TaskList tasks;
    private Ui ui;

    public Duke(String filePath) {
        ui = new Ui();
        storage = new Storage(filePath);
        try {
            tasks = new TaskList(storage.load());
        } catch (DukeException e) {
            ui.showLoadingError();
            tasks = new TaskList();
        }
    }

    public void run() {
        //...
    }

    public static void main(String[] args) {
        new Duke("data/tasks.txt").run();
    }
}

Your class names may differ from the ones given above. The design can differ too, as long as you can justify it as good OOP (there is no one correct solution for most design problems, after all).

AI Guidance » A-MoreOOP

This is an increment that lends itself well to an incremental approach. We can ask AI to proceed incrementally, rather than us deciding on the increments. Here is an example:

The target: [=====

Gradually (i.e., in small steps) extract closely related code as classes.

  • Minimal: Extract the following classes:
    • Ui: deals with interactions with the user
    • Storage: deals with loading tasks from the file and saving tasks in the file
    • Parser: deals with making sense of the user command
    • TaskList: contains the task list, e.g., it has operations to add/delete tasks in the list

For example, the code of the main class could look like this:

public class Duke {

    private Storage storage;
    private TaskList tasks;
    private Ui ui;

    public Duke(String filePath) {
        ui = new Ui();
        storage = new Storage(filePath);
        try {
            tasks = new TaskList(storage.load());
        } catch (DukeException e) {
            ui.showLoadingError();
            tasks = new TaskList();
        }
    }

    public void run() {
        //...
    }

    public static void main(String[] args) {
        new Duke("data/tasks.txt").run();
    }
}

Your class names may differ from the ones given above. The design can differ too, as long as you can justify it as good OOP.

=====]

Let's do this iteratively. In each iteration, do the following steps:

  1. Decide the next natural stand-alone increment that moves the code closer to the target.
  2. Implement that increment.
  3. Test it to ensure there are no regressions, using the /test-ui skill.
  4. Commit the changes with a detailed commit message. You have my permission to commit in this repo.
  5. Generate a visual diff using the /present-changes-visually skill. Also explain the rationale for the change and its pros and cons.
  6. Briefly outline the next increment to be done in the next iteration. If there are no more increments worth doing, say so and stop.

Go ahead and do the first iteration.

After the first iteration is done, examine the change and the rationale. If you don't agree with the change at all, ask Codex to discard the commit. If you want the change to be done in a slightly different way (e.g., you prefer a different class name), ask Codex to update the code accordingly and amend the commit as well.

When there are no more changes to be done, you can check if the stretch goal has been met. Then, you can prompt AI to go for it.

Now, let's go for the stretch goal given below. Proceed in the same iterative fashion as before.

[=====

  • Stretch goal: Consider extracting more classes, e.g., *Command classes (i.e., AddCommand, DeleteCommand, ExitCommand etc.) that inherit from an abstract Command class, so that you can write the main logic of the app as follows:
    public void run() {
        ui.showWelcome();
        boolean isExit = false;
        while (!isExit) {
            try {
                String fullCommand = ui.readCommand();
                ui.showLine(); // show the divider line ("_______")
                Command c = Parser.parse(fullCommand);
                c.execute(tasks, ui, storage);
                isExit = c.isExit();
            } catch (DukeException e) {
                ui.showError(e.getMessage());
            } finally {
                ui.showLine();
            }
        }
    }
    

=====]


A-Packages

     Divide classes into packages

Organize the classes into suitable Java packages.

Keep src/main/java as the folder, because some tools we'll use later look for the Java source code there by default.

For example, suppose you have the following structure now, and you wish to move Duke.java into a package duke.ui.

[project root] e.g., C:\courses\project\ └── src\ └── main\ └── java\ [source root] └── Duke.java (not in a package)

The correct way to do so is:

[project root] e.g., C:\courses\project\ └── src\ └── main\ └── java\ [source root] └── duke\ └── ui\ └── Duke.java (in package duke.ui)

Do not convert src, main, java into packages. For example, the following is incorrect:

[project root] [source root] └── src\ └── main\ └── java\ └── Duke.java (in package src.main.java)
  • Minimal: put all classes in one package, e.g., duke
  • Stretch goal: divide into multiple packages as the number of classes increases, e.g., duke.task, duke.command
AI Guidance » A-Packages

You can work with the AI to decide how to organize the classes into packages. Here is an example:

The requirement: Organize the classes into suitable Java packages. The src/main/java should be kept as the source root folder.

Suggest a suitable package structure for the classes in the project. Do not implement it yet.

After some back-and-forth with the AI to settle on a package structure, you can ask it to go ahead and implement it.


A-JavaDoc

     Add JavaDoc comments

Add JavaDoc comments to the code.

  • Minimal: Add header comments to at least half of the non-private classes and methods.
  • Stretch goal: Add header comments to all non-private classes and methods, and non-trivial private methods.

A-CodingStandard

     Tweak the code to comply with a coding standard

Tweak the code to comply with a given coding standard. From this point onward, ensure any new code you add complies with it too.

SE-EDU guides on configuring the code style in IDEs: IntelliJ IDEA | VS Code

AI Guidance » A-CodingStandard

As you need to follow the Java coding standard for future code, you can turn it into a reusable skill.

Create a project-specific skill named seedu-java-coding-standard based on rules given in https://se-education.org/guides/conventions/java/intermediate.html

Update your agent files to mandate following this for all code in this project.

Update the current code to follow it, where necessary.

Show me the changes using the /present-changes-visually skill.

Same goes for the Git commit message standard:

Create a project-specific skill named seedu-git-standard based on rules given in https://se-education.org/guides/conventions/git.html

Update your agent files to mandate following this for all future commits.

Next, you can do the following to check if the Git standard is followed correctly.

Propose a commit message for the uncommitted Java code changes.

If everything seems OK, you can proceed with the commits. If not, ask AI to update the skill where you see it is not following the standard.

Create one commit for the Java code changes, and one commit for each standalone change to agent files.


A-Checkstyle

     Use Checkstyle

Use Checkstyle to detect coding style violations.

Refer to the tutorial Using Checkstyle @SE-EDU/guides to learn how to use Checkstyle.

AI Guidance » A-Checkstyle

Some sample prompts:

Briefly explain Checkstyle: what it is and how it can be useful in this project.

Do we even need it? In this project we already use the /seedu-java-coding-standard to comply with the required coding standard. Is there any value in also using Checkstyle? Should we choose one only, and if yes, which one?

Set up Checkstyle for this project, as explained in https://se-education.org/guides/tutorials/checkstyle.html

Checkstyle configuration matching our Java coding standard can be found in the AddressBook Level 3 project.

How do I manually run Checkstyle?

Run Checkstyle and fix any violations found. Also explain the fixes you did, for my own knowledge.


A-CodeQuality

     Improve code quality

Critically examine the code and refactor to improve the code quality where necessary.

When implementing this increment, closely follow the 'Code Quality' guidelines you have learned so far, rather than relying solely on your own intuition.

AI Guidance » A-CodeQuality

Let's improve the code quality iteratively, one stand-alone refactoring at a time.

First, refer to code quality guidelines in https://nus-cs2103-ay2627-s1.github.io/website/se-book-adapted/chapters/codeQuality.html

Review the code against the above guidelines, identify the single highest-priority issue, and fix it. Commit the changes with a commit message that includes a detailed body explaining the rationale behind the update.

If you don't agree with the refactoring, ask AI to amend it or discard it.

Move to the next iteration.


Refer to code quality guidelines in https://nus-cs2103-ay2627-s1.github.io/website/se-book-adapted/chapters/codeQuality.html

If any of the current code needs to be improved based on the guidelines in there, go ahead and do it. One commit per change. The commit message body should explain the rationale for the change.

If you don't agree with any of the refactorings, ask AI to amend/discard them.


A-Assertions

     Use assertions

Use the assert feature (not JUnit assertions) to document important assumptions that should hold at various points in the code.

AI Guidance » Use Assertions

Sample prompt:

Use the Java assert feature to document important assumptions that should hold at various points in the code.

Justify each case.


A-Gradle

     Automate project builds using Gradle

Use Gradle to automate some of the build tasks of the project, as follows:

  • Gradle support is provided as a separate branch named add-gradle-support in the Duke repo. Merge that branch into your master branch.
%%{init: { 'theme': 'default', 'gitGraph': {'mainBranchName': 'master'}} }%%
gitGraph
commit id: "m1"
branch add-gradle-support
checkout add-gradle-support
commit id: "b1"
commit id: "b2"
checkout master
commit id: "m2"
commit id: "m3"
merge add-gradle-support id: "Merge branch ..."

Requirements for this increment:

  • Minimal: Set up Gradle so that you can build and run your chatbot using Gradle. After doing this, you can move to the next increment.
  • Recommended (to be done at a later time): Be able to run JUnit tests using Gradle (this can only be done after you've reached the A-JUnit increment).
  • Stretch goal (to be done at a later time): Use Gradle to automate more things in your project, as you progress through the project.
AI Guidance » A-Gradle

If you are new to merging branches, you can get AI's help to guide you along. Example:

Gradle support is provided as a separate branch named add-gradle-support. I have fetched that branch and merged it into my master branch. Check if I did it correctly.


Gradle support is supposed to be provided as a separate branch named add-gradle-support.

  1. Check if that branch is in my fork.
  2. I have not fetched or pulled that branch to my local repo. I need to merge that branch into my master branch. What are the steps? Explain each step.

Gradle support is provided as a separate branch named add-gradle-support in my fork. I need to merge that branch into my master branch. Go ahead and do it. Also explain the steps you took.


After merging the branch and setting it up in the IDE:

How do I check if Gradle is working?

When I run my app in IDE, I face this error (see the screenshots I've attached). This happened after I added Gradle support to the project. How do I fix it?


A-JUnit

     Add JUnit tests

Add JUnit tests to verify the behavior of the code.

  • Minimal: Use JUnit to test at least two non-trivial methods from two different classes (if you have multiple classes),
    and ensure they are tested reasonably well (i.e., the test code should try to catch most potential bugs in the target methods).
  • Stretch goal: Use JUnit to test all non-trivial public methods of all classes.

Refer to the JUnit tutorial @SE-EDU/guides to learn how to use JUnit (in the context of this project).

AI Guidance » A-JUnit

If you haven't written JUnit tests before, you may want to write the first 1-2 JUnit tests by hand.

Here's a series of prompts for ramping up the JUnit tests in the codebase.

Add a JUnit test to test one of the methods in the codebase. Choose a method that lends itself well to testing through JUnit. Include all reasonable test cases. Follow Gradle and JUnit conventions as to the file path and naming. Example:

  • Class being tested seedu.duke.Todo: src\main\java\seedu\duke\Todo.java
  • Test class seedu.duke.TodoTest: src\test\java\seedu\duke\TodoTest.java

If names of the test methods are long, you may resort to the following naming convention: featureUnderTest_testScenario_expectedBehavior()

e.g. sortList_emptyList_exceptionThrown() getMember_memberNotFound_nullReturned()

Add tests for all candidate methods that deserve tests in that class.

Test coverage target: Focus JUnit tests on the top ~50% highest-value methods (prioritizing complex, core, or critical business logic).

Go ahead and add more tests based on the above target.

Update the relevant AI documentation to reflect the test coverage target of 50%. Mention that JUnit tests need to be updated after each code change to comply with that target.


A-Jar

     Package the app as a JAR file

Package the app as an executable JAR file so that it can be distributed easily.

You can assume the user will run the JAR file in the following way only:

  1. Copy the JAR file into an empty folder.
  2. Open a command window in that folder.
  3. Run the command java -jar "{filename}.jar" e.g., java -jar "Duke.jar" (i.e., run the command in the same folder as the JAR file).

The double quotes around the filename in the java -jar "{filename}.jar" command are not normally needed, but they are if the filename contains special characters such as spaces or [.

FAQ: Can we double-click the JAR file to run it?
A: Yes, that usually works too, but being able to do so is not a requirement here. Instead, the java -jar command is the recommended way to run the JAR file.

Refer to the tutorial Working with JAR files @SE-EDU/guides to learn how to create JAR files (in the context of this project).

If your project is being revision-controlled using Git/GitHub:

  • Do not commit the JAR file created. Reason: We don't normally commit generated binary files into the repository.

  • Instead, make the JAR file available through a GitHub release:

    1. Go to your fork on GitHub and create a new release.
    2. In the page where you supply the details of the release,
      1. give an appropriate version number, e.g., v0.1
      2. attach the JAR file where it says Attach binaries by dropping them ....
AI Guidance » A-Jar

How do I update the build.gradle to create a fat JAR file for this project using the shadowJar plugin? Also explain how to create, locate, and run that JAR file.


Update the relevant files so that I can create a fat JAR file for this project using the shadowJar plugin. Explain the steps you took. Also explain how to create, locate, and run that JAR file.


A-CI

     Set up CI

Use GitHub Actions to set up Continuous Integration (CI).

The workflow specified by this .yml file is a good candidate for this project.

Refer to the Using GitHub Actions @SE-EDU/guides to learn how to use that .yml file to set up GitHub Actions.

Pushing a GitHub Actions-related file to GitHub requires you to authenticate using a that has workflow permissions (because you are modifying a workflow of your repo). If you are using Sourcetree, you can refer to Sourcetree Guide @SE-EDU/guides to learn how to connect Sourcetree with GitHub using a PAT.


A-Enums

     Use enumerations

Use Java enums, if applicable (i.e., if enums a natural fit for somewhere your current code).

AI Guidance » A-Enums

Here's a useful experiment: First, look through the code and see if you can identify any variables that can be represented as an enum. Then, ask AI to suggest a list of enums that can be used in the code.


A-Varargs

     Use var-args

Use Java varargs, if applicable.


A-Lambdas

     Use lambdas

Use the Lambdas feature of Java in your code, if applicable.


A-Streams

     Use streams

Use the Streams feature of Java in your code, if applicable.


A-Libraries

     Use external libraries

Use third-party libraries in your project. For example, you can use the Natty library to parse strings into meaningful dates.


A-UserGuide

     Add a User Guide

Add a User Guide to the project in the following way:

  • Update the given docs/README.md. See this guide to GitHub flavored Markdown (GFMD).
  • Enable the GitHub Pages feature for your fork:
    1. Go to your repo's settings tab.
    2. Click Pages on the menu on the left edge of the page.
    3. Set the Source as: [ Branch: master ] branch and [ /docs ] folder and click Save.
      You can select a theme too.
  • Go to https://{your username}.github.io/{repo name}/ (e.g., https://[[username: JohnDoe]].github.io/ip/) to view the user guide of your product. Note: it could take 5-10 minutes for GitHub to update the page.
    Carefully check the User Guide at the above URL to ensure the HTML version of the page (auto-generated by GitHub Pages from your Markdown text) has the right content. In some rare cases, the page might look alright on GitHub file preview but will not render correctly on GitHub Pages.

Minimal:

  • Ensure the chatbot name is stated clearly at the top of the User Guide.
  • Give the reader enough guidance to use all important features of your chatbot.

How detailed should the user guide be? It should be fit-for-purpose: think from the user's point of view, include as much information as the user needs, and keep the guide as short and as friendly as possible -- users don't have the patience for lengthy user guides.
You can use the 'Features' section of this user guide as a benchmark.

AI Guidance » A-UserGuide

Even if you have been updating the User Guide (in docs/README.md) all along, it is worth taking another pass at refining it before releasing your product.

Craft your own prompt to include the important requirements mentioned above.

Review the output from a user's point of view and give feedback to the AI until the user guide meets your expectations.


A-DevGuide

     Add a Developer Guide

Add a Developer Guide to the project, explaining the design and implementation to future developers.


A-Release

     Release the product

Release the product to be used by potential users, e.g., you can make it available on GitHub


A-BetterGui

     Improve the GUI

Improve the GUI to make it more polished. Some examples:

  • Tweak the GUI to match the asymmetric nature of the conversation: it is between the user and the app, not between two humans, so it makes sense not to display both sides in the same visual format.
  • Highlight errors, e.g., when the user types a wrong command, the error should be shown in a different format to catch the user's attention.
  • Tweak padding, fonts, colors, alignments to make the GUI more pleasing to look at.
    Given the app is likely to take only a small portion of the screen, and the bot replies can contain a lot of text, try to optimize for space (e.g., avoid wasting display space that simply shows the background graphics).
  • Allow users to resize the window, and ensure the content responds appropriately.
  • Profile pictures: If your GUI shows profile pictures, you can tweak the way the picture is shown (e.g., crop as a circle or a square with rounded corners). In fact, an easy tweak is to use a picture with a transparent background so that it blends nicely with the background.
    Given that the participants of the conversation are fixed (i.e., you and the chatbot), do you even need big profile pictures?
  • Focus more on tweaks that actually improve the user experience (UX). Some changes (e.g., profile pictures, background graphics) can be eye-catching but can even degrade the UX if not done right (e.g., it can make the text harder to read).

You can take inspiration from these past projects. If you adopt any ideas from them, don't forget to give credit to the original author.

Minimal requirement: Implement at least one of the examples (i - vi) given above.

A-Personality

     Give a unique personality

Choose a unique personality for your chatbot, and tweak the following aspects to go with that personality:

  • Name
  • Phrases used by your chatbot (e.g., when responding to a command)
  • GUI (colors, icons, font, etc.)

A-MoreTesting

     More automated tests

Write more JUnit tests, to cover nearly all code that can be tested automatically.

You may omit code that is hard to test automatically, e.g., GUI functionality (test it manually instead).

This can include more manual testing as well, e.g., testing on different OSes, different screen resolutions, different OS language settings (English vs Chinese).

A-MoreErrorHandling

     More error handling

Improve the code to handle all errors you anticipate the product will encounter during usage.

Some examples of errors:

  • command format errors: multiple spaces where only one is expected, trailing/leading spaces in the command, an essential parameter missing, a parameter specified multiple times, special characters used where they are not expected, ...
  • environment issues: an expected file is missing, access to a file is denied, a file's content is not as expected, ...
  • data is not as expected: start date/time is later than (or same as) end date/time, a value that should be unique is duplicated (e.g., two tasks with the same details), non-existent dates (e.g., Feb 30).

A-AiAssisted

     Enhance the code using AI tools

Use AI tools (e.g., GitHub Copilot, ChatGPT, Claude, Cursor, etc.) to enhance your chatbot code. For example, you can get AI tools to help you,

  • improve the quality of the current code.
  • tweak an existing feature to make it more useful to the user.
  • add or improve documentation, tests.

You can refer to the se-edu guide on AI-Assisted Coding for further resources.

Category B Extensions

B-TentativeScheduling

     Tentative scheduling

Provide a way for an event to be tentatively scheduled in multiple slots, and later to be confirmed to one of the slots.


B-Snooze

     Snoozing/postponing tasks

Provide a way to easily snooze/postpone/reschedule tasks.


B-RecurringTasks

     Recurring tasks

Provide support for managing recurring tasks, e.g., a weekly project meeting.


B-DoAfterTasks

     'Do after' tasks

Support the managing of tasks that need to be done after a specific time or task, e.g., return book after the exam is over.


B-DoWithinPeriodTasks

     'Do within a period' task

Provide support for managing tasks that need to be done within a certain period, e.g., collect certificate between Jan 15 and Jan 25.


B-FixedDurationTasks

     Unscheduled tasks with a fixed duration

Provide support for managing tasks that take a fixed amount of time but do not have a fixed start/end time, e.g., reading the sales report (needs 2 hours).


B-Reminders

     Reminders for tasks

Provide a way to get reminders about tasks, e.g., remind the user about upcoming deadlines.


B-FindFreeTimes

     Find free times

Provide a way for the user to find free times, e.g., when is the nearest day on which I have a 4-hour free slot?


B-ViewSchedules

     View schedules

Provide a way to view tasks in the form of a schedule, e.g., view the schedule for a specific date.


B-DetectAnomalies

     Detect scheduling anomalies

Deal with schedule anomalies, e.g., detect if a task being added clashes with another task in the list.

Category C Extensions

C-DetectDuplicates

     Deal with duplicate items

Add the ability to recognize and deal with duplicate items, e.g., the same task added multiple times.


C-FlexibleDataSource

     Flexible data source

Provide more flexibility with the data source, e.g., let the user specify which file to use as the data source.


C-Sort

     Sorting items managed by the app

Provide a way to sort items, e.g., sort deadlines chronologically.

C-NaturalDates

     More natural date formats

Support more natural date formats, e.g., Mon in a user command can be interpreted as the date of the next Monday in the calendar.

C-BetterSearch

     More flexibility in searching for items

Allow more flexibility in search, e.g., find items even if the keyword matches the item only partially.

C-Update

     Easily edit items

Provide a way to easily edit item details, e.g., change the end time of an event without changing anything else.

Minimal: the ability to update an existing item without having to delete it first.

Other ideas:

  • the ability to clone items (to easily create new items based on existing items)

C-Tagging

     Tagging items

Provide a way to tag items, e.g., tag a task as #fun.

C-Priority

     Prioritizing items

Provide a way to attach priorities to items, e.g., mark an item as a high priority (or priority level 1).

C-Archive

     Archiving items

Provide a way to archive items so that the user can remove items from the app but still keep a record of them somewhere, e.g., archive all tasks in the list into a file so that the user can start over with a clean slate.

C-MassOps

     Mass operations

Provide a way to perform operations on multiple items, e.g., delete some specific items in one go.

C-Statistics

     Statistics and insights

Provide a way to see useful statistics about the items managed by the app, e.g., show the number of tasks that have been completed in the past week.

C-Undo

     Undo

Provide a way to undo a command.

Minimal: the ability to undo the most recent command.

C-Help

     Give help to users

Provide in-app guidance to users.

Minimal: add a command to access a help page.

Other ideas:

  • Load the app with some sample data at the first run.

C-FriendlierSyntax

     Friendlier syntax for commands

Make the command syntax more flexible.

Minimal: provide shorter aliases for keywords, e.g., t can be a shorter alias for todo.

Other ideas:

  • Allow users to define their own aliases
  • Remove the need for the parts of a command to be in a specific order

Category D Extensions

D-Contacts

     Support managing contacts

Support managing info about contacts, e.g., details of friends.

D-Notes

     Support managing notes

Support managing small snippets of textual information the user wants to record, e.g., their own waist size, or a movie title they want to remember.

D-Expenses

     Support managing expenses

Support managing info about expenses, e.g., the amounts spent on food, books, transport, etc.

D-Loans

     Support managing loan records

Support keeping records of loans given/taken, e.g., money lent/owed to colleagues/friends.

D-Places

     Support managing info about places

Support recording details about places, e.g., restaurants the user has visited, for future reference.

D-Trivia

     Support managing trivia

Provide the ability to learn/memorize things, e.g., learn vocabulary, answers to questions.

D-Clients

     Support managing client info

Support managing info about clients, e.g., for an insurance agent to keep track of clients.

D-Merchandise

     Support managing merchandise info

Support managing info about merchandise, e.g., for a property agent to keep track of properties, or for a stamp collector to keep track of items in the collection.