Week 7 [Mon, Sep 28th] - Project
iP:
- [Optional] Add AI features to the iP
- [Optional] Get more out of the iP
tP: v1.1
- Do a 'workflow practice' session Thu, Oct 1st 23:59
- Update the README.md and site-wide settings
- Update the DG: user stories, glossary, NFRs, use cases
- Start the next iteration
iP
1 [Optional] Add AI features to the iP
Interested in adding AI features to the iP? Example:
User: @ai is there a command to add priorities to tasks?
App: Currently, there is no built-in command to add priorities to tasks.
You can follow the SE-EDU guide Adding AI Features to a Java App to learn how to do that.
Recommended: Add this feature in a separate branch, just to explore how far you can go. If you reach a version of this feature that is good enough for users (e.g., the app can still be used even if the user does not have an API key for the LLM), feel free to merge the feature and release a new JAR for the iP. In that case, remember to update the user guide on how to configure and use this feature.
2 [Optional] Get more out of the iP
If you want to cite the iP on your résumé, you can make it more compelling to potential employers. These improvements are not considered for grading and can be done after the semester ends. Some ideas:
Time to use AI to enhance and multiply the value of iP
Even if you have been hesitant to use AI for the iP up to now (e.g., to prioritize learning over productivity), you can make more liberal use of AI now. You have learned the basics, and continuing to hand-code the iP has less learning value. Besides, you need to learn how to use AI effectively.
- Make the iP better:
- Improve the GUI: Make the UI look nicer, more distinctive, and memorable. You can get inspiration from what others have done (but remember to give credit if you reuse any code from them).
- Add a demo video or an animated GIF to your user guide to show how the app works.
- Improve code quality: The iP is the right size to cite as an example of your code quality. You can use the RepoSense link (</>) in the iP Showcase page to point to your iP code.
- Add more features. For example, add one of the Category B, C, or D extensions listed here.
- Create new projects using the iP as a template:
- Start by creating an app modeled on the iP but with a different purpose and appearance.
- Continue to create more products, each one going further than the one before, thus helping you to learn something new.
- Create product websites for your other projects, such as those from other courses or pet projects.
- Create a home page for yourself, including a product portfolio page to showcase your projects.
- You can ask AI to help you create a home page on GitHub (free).
tP: Practice Iteration → v1.1
Intro to tP Week 7
What's happening this week:
This week, we do the first tP iteration: v1.1.
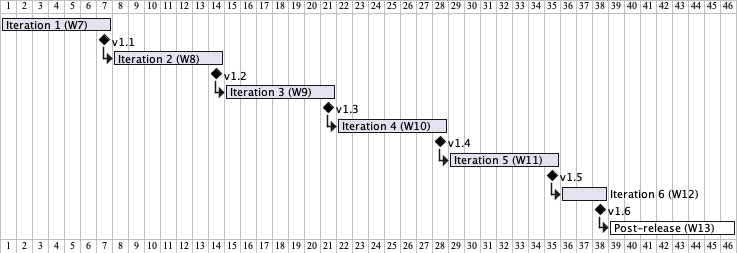
Each tP iteration focuses on a specific learning outcome, a corresponding product goal, and a strategy that we'll use to achieve both. The ones for this tP iteration (i.e., v1.1) are given below:
v1.1
- Learning outcome: Able to follow the workflow as a team.
- Product goal: Update some documents to match the new product direction.
- Strategy: Practice the workflow while updating the documents.
Aim to do 'just enough': Note how the Product goal (together with the Strategy) is simply a means to achieve the Learning outcome. Unlike in a real SE project, the product in the tP exists only to help you achieve the learning outcome. Hence, aim to do 'just enough' work on the product to achieve the intended learning outcome of the iteration (e.g., don't make features bigger than needed) so that the tP doesn't increase your workload more than necessary.
This is a 'practice' iteration, limited to a documentation update only.
Specifically, we start with a workflow practice session (in task 1), and then do further documentation updates in tasks 2 and 3.
Things to note:
COMMON MISTAKE: Not following the convention for Git commit message subjects.
Caution: This is very hard to rectify later, after the PR containing the commits has been merged.
COMMON MISTAKE: Forgetting to create each PR from a separate branch of your fork (i.e., sending the PR from the master branch).
Start using Git via the CLI
If you have been using Sourcetree (or another GUI) for Git, we strongly recommend that you move toward using the CLI to perform Git tasks in the second half of the semester. Doing so will strengthen your Git knowledge (because the CLI takes you closer to what's actually happening, while GUIs might hide such details).
But you can continue to use your favorite Git GUI for a more 'visual' view of your repo, side-by-side with the CLI. For example, from Sourcetree, you can open a Git Bash terminal, run the command in that terminal, and see the result in the GUI.
1 Do a 'workflow practice' session Thu, Oct 1st 23:59
Task: Do a 'workflow practice' session to familiarize all team members with the workflow you need to follow in the tP.
Why?: The ability to modify a team-owned codebase in parallel is an important learning outcome of this course. Following a suitable workflow is critical for achieving that. This practice iteration is for you to get used to the workflow that you need to follow in the tP.
Strongly recommended to do this as a team activity (preferably F2F, or else connected via Zoom/MS Teams). That will help you proceed faster and will also make it easy for you to help each other with workflow matters.
Steps:
- [one member] Set up the issue tracker of your team repo, if you haven't done so already.
In addition, create a milestone namedv1.1and set an appropriate deadline (i.e., the same as, or earlier than, the iteration deadline).
- [each member] Fork and clone the team repo, if you haven't done so already.
- [each member] Add your photo to the repo while following the prescribed tP workflow. Here are the steps :
- Read the 'tP Project Schedule Tracking' overview given below.
- Create an issue to represent the task at hand, e.g.,
Add Jake's photo.
- Assign the issue to yourself, to indicate you are taking responsibility for it.
- Assign the issue to the milestone
v1.1to indicate this task is due inv1.1, as given in the panel below.
- Create a pull request for it, while taking care to follow the workflow prescribed in the panel below. Details of the photo to be added are given below the expandable panel.

Adding a photo
- Add a suitable photo of yourself, as described here.
- The filename of the profile photo should be
docs/images/github_username_in_lower_case.png
Note the need for lowercase e.g.,JohnDoe123->docs/images/johndoe123.png, notdocs/images/JohnDoe123.png.
If your photo is in jpg format, name the file as.pnganyway.
- Add a suitable photo of yourself, as described here.
- Get a team member to review the PR. For example, the reviewer can check if,
the file is in the right location,
the file name is as expected,
the PR is sent from a fork, and is from a separate branch,
commit messages comply with the Git Conventions.
- Merge the PR.
After that, sync your local repo and your fork with the team repo.
- Good job on merging the first PR into the team repo!
- [each member] Update the AboutUs page as parallel PRs. In this step, we attempt to send parallel PRs that update the same page, which can result in merge conflicts (hence, you get to practice resolving merge conflicts in a team project):
- Create an issue, and a PR, for the following task, similar to steps 3.2-3.5 above (do not merge the PR yet).
Updating the AboutUs page:
This page (in the /docs folder) is used for course admin purposes. Please follow the format closely or else our scripts will not be able to give credit for your work. Similarly, do not split the given .md files further into multiple files, as our grading script will check only those files.
- Update the following links, which appear below the photo:
[homepage]: Link it to your home page, if you have one. Otherwise, you can remove it.[github]: Link it to your GitHub profile page.[portfolio]: This link is to be used for an optional deliverable called the Project Portfolio Page that will come later. You can remove it for now, and put it back if you decide to opt in for that deliverable at the end of the tP.
- Indicate the different roles played and responsibilities held by each team member. You can reassign these roles and responsibilities (as explained in Admin Project Scope) later in the project, if necessary.
- There is no need to mention the tutor/lecturer, but it is OK to do so.
- Wait until all team members have sent the PR for the above step.
Review each other's PRs while waiting.
- Merge one of the PRs sent in step 4.1 (e.g., the one that arrived first). If this causes conflicts in other PRs, resolve those conflicts.
This week's tP briefing video (Part 2a -- v1.1, Workflow) has a section on how to resolve conflicts in PRs. - Merge the remaining PRs one at a time, while resolving merge conflicts as needed.
- Check the AboutUs page in your team's repo to confirm that the page appears as expected (example).
If something is not right, you might have to create another PR to rectify it.
- Congrats! You are done with this workflow practice session
2 Update the README.md and site-wide settings
Now that you have learned the tP workflow, you can proceed to update a few more documents in the tP repo, as per tasks A and B below, following the same workflow (though doing parallel PRs is optional).
Recommended procedure for updating docs:
- Decide among yourselves who will update which parts of the document(s).
Note: All team members are expected to contribute to . - Update the team repo by following the prescribed workflow:
Guidance on using documentation tools (e.g., how to preview changes locally before committing/pushing) can be found in the relevant section of the Developer Guide of your team project website that you set up earlier. Given below is a shortcut for your convenience:
- If your project is using Jekyll for documentation, refer to this Jekyll Guide @SE-EDU/guides.
- If your project is using MarkBind for documentation, refer to this MarkBind Guide @SE-EDU/guides.
Each member must PR their part of the documentation work. Reasons:
- We use Git data to detect contributions to documentation. If one person commits all documents on behalf of the entire team, our grading scripts will identify that person as the sole contributor to documentation.
- Git authorship data will help you identify the person responsible for specific bugs in documentation.
- The project is intended as an exercise for you to practice using Git to manage changes to the same code in parallel.
AI-generated commits should be owned by a team member. Even if a commit is generated by AI, the author field of the commit should indicate which team member is responsible for it. Do not leave it as Claude or Codex. Instruct your AI to commit using your name as the author. If not, the work will not be credited to any team member as we can't identify who directed the AI to do the work.
A: Update the README.md to match your project:
- Add a UI mockup of your intended final product. Note that the image of the UI should be
docs/images/Ui.pngso that it can be downloaded by our scripts. Limit the file to one screenshot/mockup, and ensure the new image has roughly the sameheight x widthproportions as the original one. Why same proportions?
The UI mockup can be a hand-drawn sketch or created using a tool such as PowerPoint, PlantUML, or Figma. Don't spend a lot of time on this, as this will eventually be replaced by a screenshot of the actual product.
Can we use an AB3 screenshot for this? Only in the unlikely case that your final product UI is expected to look exactly the same as AB3. - Update the link of the GitHub Actions build status badge (
 ) so that it reflects the build status of your team repo.
 - Acknowledge the original source of the code, e.g.,
This project is based on the AddressBook-Level3 project created by the [SE-EDU initiative](https://se-education.org). - Update all remaining contents of the page to match your own project (i.e., it should read like the README.md of an actual project, not that of a sample project given to students).
If you did the above updates correctly, your UI mockup and profile photos should appear on your project website and this Project List Page.
B: Also update site-wide settings, as necessary:
You need to update the
AB-3in the top navigation bar of your project website (it's indocs/_config.ymlanddocs/_sass/minima/_base.scssif using Jekyll; indocs/_markbind/layouts/default.mdif using MarkBind).More info on updating site-wide settings such as the above:
- If using Jekyll: follow the Jekyll Guide @SE-EDU/guides.
- If using MarkBind: follow the MarkBind Guide @SE-EDU/guides.
- If using Jekyll: follow the Jekyll Guide @SE-EDU/guides.
3 Update the DG: user stories, glossary, NFRs, use cases
Add the following to the DG, based on your project notes from the previous weeks. No need to update other sections for now.
Some examples of these can be found in the AB3 Developer Guide.- Target user profile, value proposition, and user stories: Update the target user profile and value proposition to match the project direction you have selected. Give a list of the user stories (and update/delete existing ones, if applicable), including priorities. This can include user stories that were considered but will not be included in the final product.
- Use cases: Give representative use cases (textual form) that need multiple steps to complete.
- Non-functional requirements: List whichever NFRs you think are reasonable for your product.
Some of the given project constraints can be framed as NFRs (e.g.,Constraint-Portable) while others are purely for pedagogical/course-admin purposes (e.g.,Constraint-Incremental). - Glossary: Define terms that are worth recording.
The above DG sections should cover the full requirements of the product, some of which might not even get implemented by the end of this semester. That is, do not limit them to just the requirements you intend to implement in the next iteration. Reason: All identified requirements need to be documented for future reference.
Furthermore, these sections will be graded at the final project evaluation, and any bugs in the content can cost you marks at that point. The panel below gives some relevant DG bug examples you can look out for:
Add your DG content into the docs/DeveloperGuide.md (i.e., do not split that file further into multiple files), as only that file will be checked when our grading scripts look for your content contributions to the DG.
A similar restriction applies to the UG, i.e., add your content to the docs/UserGuide.md (do not split that file into multiple pages).